How to propagate begonias from leaf cuttings
Discover how to take leaf cuttings from begonias - with a tip from Gardeners' World.

Image credit: BBC
Discover how to take leaf cuttings from begonias - with a tip from Gardeners' World.
As winter gradually approaches, my gardening focus is slowly moving towards keeping warm, staying dry and tending to my houseplants.
Last week I was indoors, taking leaf cuttings of my Cape primroses, (streptocarpus) on a Friday evening while watching Gardeners’ World. I noticed they too were taking leaf cuttings of another popular houseplant – begonias.
On the episode, Gardeners’ World, presenter Rachel de Thame visited the beautiful York Gate gardens on the outskirts of Leeds, which is managed by the gardening charity Perennial. Due to the size of the garden, the team propagate many of the plants themselves, from both seeds and cuttings.
Rachel de Thame met up with gardener Ellie Machell, who is responsible for propagating many of their plants on-site at York Gate to discover how she propagates her begonias from leaf cuttings.
Read on to discover how they propagate their 'foliage' begonias – and a few of my own tips for successful new plants.

Leaf cuttings of 'foliage' begonia houseplants can be taken at most times of the year according to Machell: “So long as you’ve got the [plant] material, you can do it at any time really.
“It’s about making sure they’ve got the right protection and the right environment. They need moisture, and they need some heat underneath to get them going.”
The compost mix made by the York Gate gardeners in which to propagate their begonia leaf cuttings was gritty and well-drained. They used a peat-free compost and added horticultural grit. Rachel de Thame described the compost as feeling a bit like a cake mix, in that it had a nice and open consistency.
When I’m taking leaf cuttings, I also make up a free-draining mix using five parts peat-free compost to one part perlite, or horticultural grit.
The York Gate team dampen the compost slightly before placing the begonia onto it, so the leaves aren’t going into a completely dry medium.
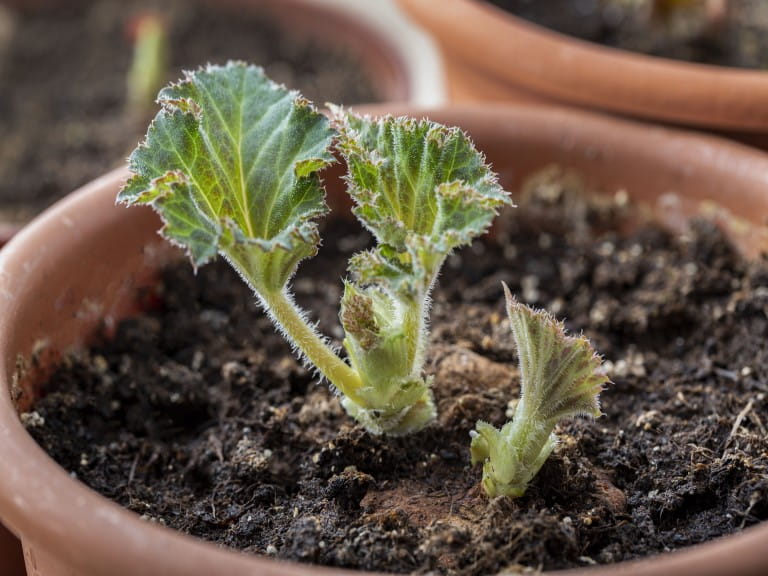
Machell removes a leaf from the main begonia plant including a short section of the stem. This stem is used to anchor the leaf on the surface of the compost once the leaf has been prepared. She then simply trims around the leaf to make it smaller so it can fit on the seed tray.
The leaf is then turned over so the veins running through the large leaves can be seen clearly. Using a scalpel or scissors, two or three small cuts are made into each vein.
The idea is that a new baby plant will appear from each of these ‘wounded’ areas. It may seem harsh to the plant, but as Rachel de Thame said: “That’s what activates the growth.”
The gardeners then make a little hole in the gritty compost with a dibber.
The short stem is inserted into it to anchor the plant in place. It is important that the underside of the leaf is now in full contact with the surface of the gritty compost.
The team use a few tiny pebbles as weights around the edges of the begonia leaves to ensure they are lying flat and are firmly in contact with the compost. Machell explained: “We then just repeat the process until we fill the tray.”
When I take leaf cuttings, I often use hair pins to hold the leaf firmly down onto the compost. This gives more surface area on the leaf for the baby begonias to grow from.
No propagator? Place your cuttings on a windowsill instead
Once the begonia cuttings have been secured on the gritty compost, they need to be kept somewhere warm. Ideally, they should be placed in a propagator to encourage rooting and so the baby begonias can emerge from the wounds from the original plant.
If you’re propagating begonias in winter, and don’t have a propagator, you could place them on a ledge over a warm radiator. Just keep an eye on the moisture levels of the compost and ensure it does not get too dry.
Although begonias do not like damp soil or over-watering, the cuttings will need monitoring to check they haven’t dried out completely. New baby begonias will emerge from the surface of the leaves over the next two or three months.
When they are about 5cm (2in), they can be carefully removed from the original leaves and potted on individually into pots with the same gritty compost.
Many of us will be familiar with the beautiful, flowering houseplants that originate from South Africa called Cape primrose or streptocarpus. They flower profusely for several months of the year and come in a range of different colours.
I remember being shown how to propagate them from leaf cuttings when I first started my horticultural career, and I was fascinated by how easy it was. Since then, I have collected lots of different coloured varieties to display at home, and often propagate them to give as gifts to friends.
To propagate a Cape primrose, simply remove a young, healthy leaf from the original plant. Use scissors or a scalpel to cut the leaf in half down its length (the area is also known as its ‘mid rib’). You can use hormone rooting powder on the ‘cut’ edge of the half leaf, but I find they readily produce new plants without needing to do this.
Insert these leaf cuttings just by a few millimetres, lengthways along the edge that has just been cut, into a gritty peat-free compost placed in a seed tray. If you’re doing a few leaf cuttings, then leave 2cm (0.8in) between each one in rows. Ideally these should then be placed in a propagator, but on a warm windowsill will suffice.
After a few weeks, baby plants will appear from the edges of the inserted leaf edge, and it’s really magical the first time you see this happen.
These baby Cape primroses can be carefully removed from the original main leaves and planted separately into individual pots.
If you are interested in growing Cape primroses, Dibleys’ Nurseries sell a wide range of both these and begonias. Dibley’s also has a helpful video on propagating begonias from leaf cuttings, using a slight variation of the technique used on Gardeners’ World.
The full show (episode 26, September 22 2023) can be watched on BBC iPlayer. You will need a TV licence for permission to watch, and you may need to create an account.


Expert nutritionists break down the most important foods to eat in each decade as we get older.

We reveal the 7 best tinned foods to supercharge your health while saving you time and money.

From ketchup to mayo – how healthy are your sauces? We find out the pitfalls and surprising benefits of our favourite condiments.

Could honey be the sweetest way to supercharge your health this year? Our experts explain the benefits and which to buy.

Our expert guide to the common foods you shouldn't mix with prescription drugs.

Experts reveal whether chilled supermarket soups are worth the extra cost and if some flavours are better for you than others.

Looking after your gut health could be one of the biggest things that you can do for your overall health. Here are the best foods to keep your gut happy.
The foods that could help you live longer and protect against chronic illness.


A dietician reveals which foods can help protect vision and prevent age-related eye conditions.

Everything you need to know about protein, from how it benefits your body to the best high-protein foods – and how much you really need.