
Image credit: Shutterstock/Blue Planet Studio
Push ups or press-ups: whatever you want to call them, they’re a nemesis for many – even the more seasoned exercisers amongst us.
When I first started exercising regularly, I thought there would never be a day when I became capable of completing one push up on my toes. As with most exercises though, a bit of perseverance and a lot of work perfecting the right technique, and I got there.
Push ups aren’t easy. After all, you’re essentially lowering all your body weight to the floor and then pushing it back up again. But they are a great strength training exercise for improving chest, triceps and core.
Over the years, I’ve coached many people to achieve the perfect push up for them, and now I’m going to walk you through it with a step-by-step guide.
A push up is a ‘compound’ exercise, meaning it works multiple muscle groups at once. Personally, I like compound movements – if I’m going to exercise, I want it to be worth it!
One of the benefits of strength training is building muscle, and push ups are great for building upper body and core strength, no matter which variation you do. In everyday life we are constantly required to push or pull things – whether that’s opening a heavy door, pushing a lawnmower, or carrying shopping bags.
It’s useful, therefore, to keep our muscles in good condition by exercising them.
Think of the core muscles as a band around your middle. When we talk of the core we include the abdominal muscles, but also the muscles in the lower back and the glutes (bum).
It’s these muscles that work to stabilise us in movement, hold us upright and protect our back from injury. In a push up, the core works to hold us in a straight position.
There’s a phrase I use a lot when coaching groups: what’s perfect for you won’t be perfect for your neighbour. We are all different – in age, weight, height, mobility, physical ability and so much more – and this will affect what the perfect push up looks like for each of us.
We will go on to look at many variations of push up, so you’ll be able to pick a style that suits you best, but for now, let’s examine the traditional push up technique.
Exercise: push up
Equipment needed: optional mat for hands or knees if needed
Areas worked: chest, arms, shoulders, core
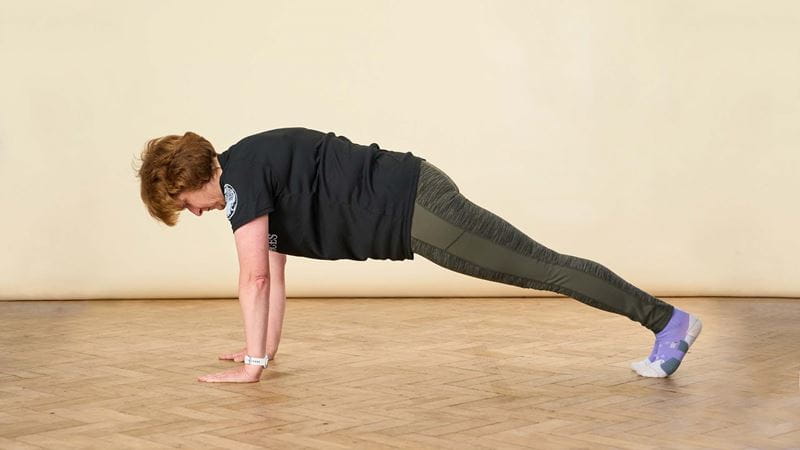
Practise getting into this starting position and holding it, even if you’re not going to be doing push ups on your toes just yet.
Holding this ‘high plank’ helps develop core control and balance. It’s a good workout on its own, and you can gradually increase the time you hold it for.
Here are some common mistakes I see when coaching people to do push ups. Don’t worry if you’re doing them – we’re all learning! But it’s useful to watch your form, either in a mirror or better yet by videoing yourself, and then correcting these mistakes if you spot them.
If you’re having trouble keeping your hips down, your hands might be too far forward – they need to be directly under the shoulders in a push up.
A common issue, but easily corrected. Look at your hand position first (see above). Also check head alignment – you don’t need to look to your toes, they aren’t doing anything interesting.
Keep your neck in line with the spine, so your gaze naturally rests on the ground two or three inches in front of you.
It’s important you move your chest, core, hips and legs down as one and back up again too. Don’t leave your bum behind! When I do push ups, in my head I repeat, “Lower yourself into the hole, then push the ground away”.
I think of lowering my whole body into a pit, Mission Impossible-style, and then pushing the floor away to come back up.
This can be an issue if you don’t have much core strength. Work on holding the starting position, increasing the time until you’re able to confidently stay in a good solid plank for 20–30 seconds.
In a push up, you want to lower the body until it’s around three inches from the floor. At that point, your elbows will be at a 90-degree angle. If you can’t get down low enough, you won’t benefit from the movement. Instead, try one of the alternatives below and build from there.
Doing a full push up can be difficult. It’s an advanced exercise and does require a degree of strength and flexibility to make it happen.
But we all start somewhere, and there are many variations to push ups that are perfect for beginners. Look at the list below and pick a variation that suits your fitness level.
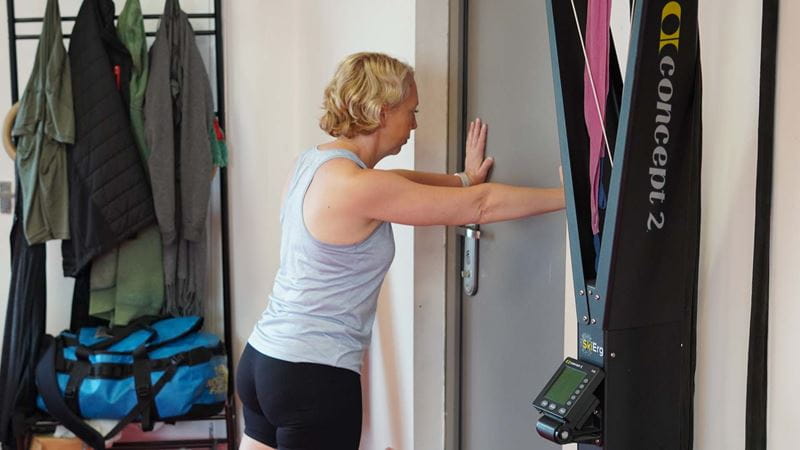
This is a great option for beginning to build strength in the arms and flexibility in the shoulders.
When you can do three rounds of between five and eight repetitions (reps) with ease, move on to incline push ups.
It’s important that you use a stable surface such as a gym bench for this exercise.
When you can confidently perform three rounds of five to eight reps, move on to bent knee push ups.
Once you can confidently perform between five and eight reps, try one push up on your toes and the rest on your knees, until you can add another rep on your toes and so on. If you find your technique is not as good or you can’t get as low, go back to bent knee push ups.
Remember – there’s no rule to say you must learn to do push ups on your toes! Pick a style that works for you and only progress to the next level if you feel physically able to do so.
If you’re a push up pro, you might like to try one of these variations for an extra challenge:
Push ups are great for home workouts or bodyweight strength training. They’re a good way to build muscle with no equipment needed, so you can try them out at home as much as you like.
Sets of five to eight reps is ideal, and about three or four rounds works best. Remember to rest between rounds though.
If you want, you could add them into a gym workout routine or combine them with the best arm exercises for an upper body blast.


Your questions answered about what really is a good 5k time.


